Today, I would like to talk about working with STM32 microcontrollers using the VSCode source code editor in the Linux operating system. This article is intended for beginners and will provide a step-by-step guide to creating a simple project, highlighting some of the less obvious points. Questions about how it works and how to set everything up as flexibly as possible will be left for the next article.
Since this article is aimed at beginners, we will follow the path suggested by STMicroelectronics. Specifically, we will use their extension for VSCode to manage the project.
Installation
VSCode
First, you need to install VSCode. You can download it from the official website or via Flatpak. For Debian or Ubuntu users, you can also add the repository to ensure VSCode updates along with the rest of your system:
sudo apt-get install wget gpg
wget -qO- https://packages.microsoft.com/keys/microsoft.asc | gpg --dearmor > packages.microsoft.gpg
sudo install -D -o root -g root -m 644 packages.microsoft.gpg /etc/apt/keyrings/packages.microsoft.gpg
echo "deb [arch=amd64,arm64,armhf signed-by=/etc/apt/keyrings/packages.microsoft.gpg] https://packages.microsoft.com/repos/code stable main" |sudo tee /etc/apt/sources.list.d/vscode.list > /dev/null
rm -f packages.microsoft.gpg
# And install vscode
sudo apt install code
However, this will not work for Ubuntu, as Canonical is aggressively promoting snap, so you can only install vscode using it.
snap install codeUnfortunately, we need to use VSCode specifically. VSCodium (a clean build of VSCode without telemetry) cannot be used because the extension from ST requires IntelliSense, which is a Microsoft extension and only works on Microsoft builds. Due to this dependency not being met, the stm32-vscode-extension is simply absent from the market.
Next, you need to install a special extension - STM32 VS Code Extension. In 2024, ST released a new version 2.0.0 of this extension, essentially rewriting it from scratch. Now it does not create a project in its own format, which could only be opened using this extension, but rather just adds a debugger configuration for a project generated by CubeMX. This became possible because in early 2024, CubeMX added support for generating CMake projects (this extension can only work with CMake).
For the full functionality of this extension, several additional programs need to be installed:
- CubeMX - a well-known tool for generating project templates.
- CubeCTL - a toolchain designed for working with STM32 controllers.
- MCU Finder - a utility for finding alternative controllers.
CubeMX
The latest version of CubeMX can be downloaded here. You need to download the archive, extract it, and run SetupSTM32CubeMX-*, where the asterisk should be replaced with the version number you downloaded earlier. It's recommended to run the installation as a regular user (not as root) to avoid issues with CubeMX updates in the future. During the installation process, you need to agree to the license and choose a folder for installing CubeMX.
However, after installation, the CubeMX icon might not appear in the application menu or in rofi. You can fix this manually by creating a file ~/.local/share/applications/stm32cubemx.desktop:
[Desktop Entry]
Name=STM32CubeMX
GenericName=STM32CubeMX
Comment=Graphical tool for configuration of STM32 Microcontrollers
Exec=/home/STM32CubeMX/STM32CubeMX
Terminal=false
X-MultipleArgs=false
Type=Application
Icon=/home/STM32CubeMX/help/STM32CubeMX.ico
StartupWMClass=STM32CubeMX
StartupNotify=true
Instead of /home/STM32CubeMX/, you will need to use your installation path for STM32CubeMX.
CubeCTL
In addition to the code generator, you need a toolchain, which is provided by STM32CubeCLT. It consists of a set of console utilities (GCC, GDB), a set of SWD files, and STM32CubeProg in a console version. You can download it here. It is recommended to install the generic version for Linux, not a specific distribution version, and also not as root.
After extracting the archive, you will have access to a file with a .sh extension. You need to make this script executable and run it for installation:
unzip en.st-stm32cubeclt*.zip
chmod +x st-stm32cubeclt*.sh
./st-stm32cubeclt*.sh
The commands above use a wildcard symbol - *, which the shell will replace with the rest of the file name. However, if there are files in the folder with matching patterns, this might not work correctly, and in that case, you'll need to enter the full path manually.
Next, you need to agree to all the license-related questions (and there will be many) and not miss the moment when the question about the installation location is asked - STM32CubeCLT install dir?. You will need to either agree with the default option or specify your path.
After installation, the paths to the compilers and other software should appear in PATH, which is necessary for the extension to work. You can check this with the command echo $PATH. If this does not happen (as it did on my Debian with ZSH), you need to do it manually by copying the contents of /etc/profile.d/cubeclt-bin-path_1.15.1.sh (substitute the necessary version) to the end of .bashrc or .zshrc if you use ZSH.
MCU Finder
Additionally, if needed, you can install the ST-MCU-FINDER-PC package. This package is optional and intended for finding microcontrollers based on specific criteria. It can be launched from the extension menu. Personally, I do not use or install it, as its functionality is duplicated in CubeMX.
Creating a Project
Now, let's create a simple project that blinks an LED once per second and outputs a message to the console. Along the way, I will discuss some nuances of working with CubeMX that are not immediately obvious. Full documentation can be found in this document.
CubeMX
To start, it's a good idea to go to the settings by pressing alt + s and change the Repository folder so that the packages downloaded by CubeMX don't end up cluttering your home directory.
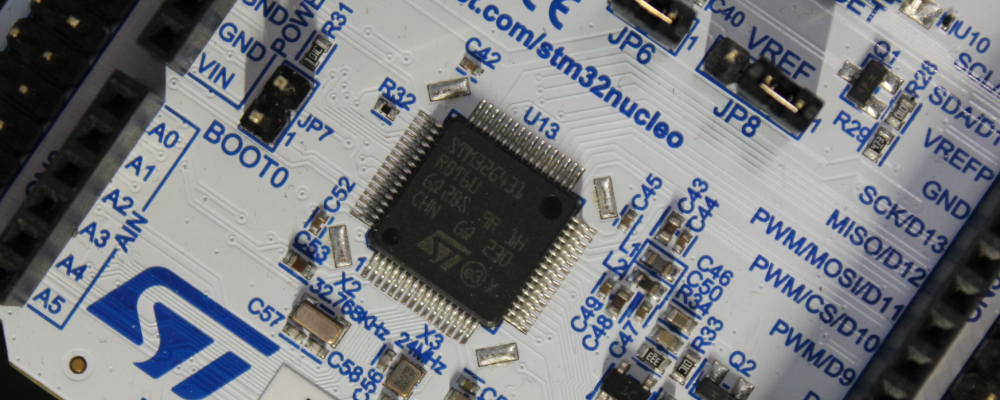
Let's create a project for the STM32G431RBT6 microcontroller. I will be using the NUCLEO-G431RB board.
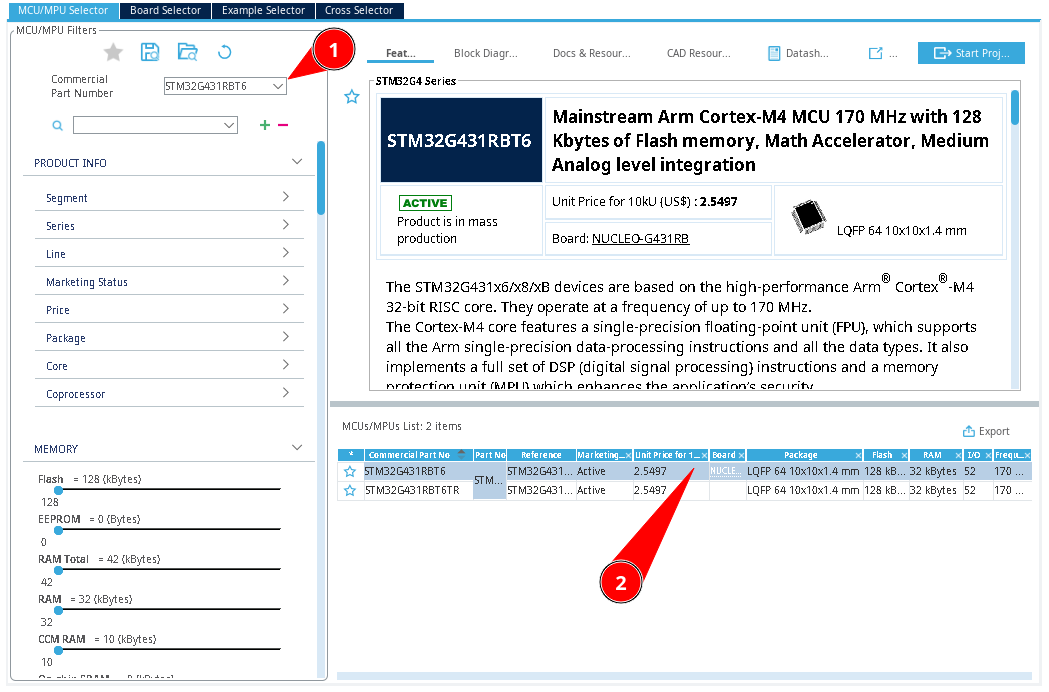
First, select the microcontroller:
Then you will enter the main configuration menu of the microcontroller.
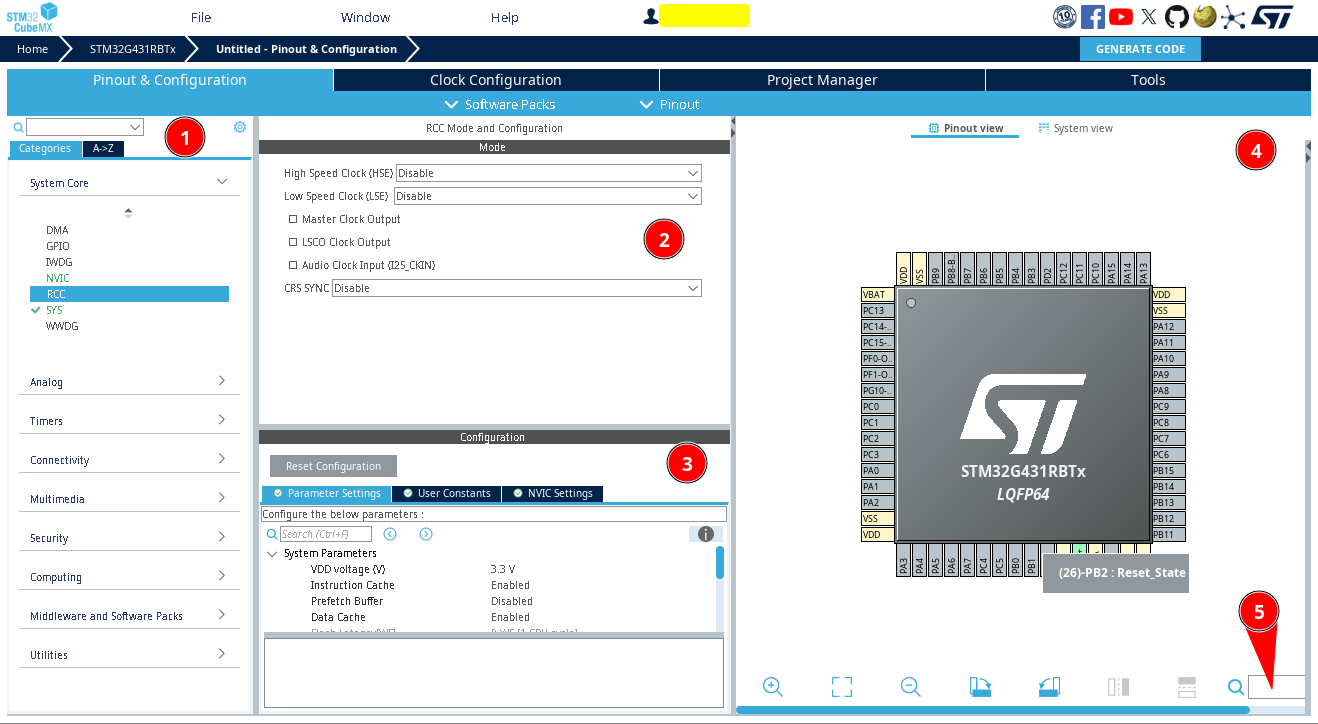
Here, everything is quite simple:
- In the left menu (1), select the specific peripheral block.
- In the menu (2), choose which functional blocks of this peripheral will be enabled.
- In the menu below (3), select specific parameters of the peripheral.
- In the window (4), you can choose specific pins and their functions.
There is also a convenient fuzzy search for pins (5). For example, you can start typing
ETR, and the search will show all pins with timers that have this function.
For this project, you need to enable the core clock through Pinout & Configuration -> System Core -> RCC -> High Speed Clock (HSE) and the real-time clock through Pinout & Configuration -> System Core -> RCC -> Low Speed Clock (LSE). Since this board has crystals for both HSE and LSE, select Crystal/Ceramic Resonator for both. However, to ensure proper operation, you need to make sure that the correct frequency is selected for these clock sources, which will be mentioned later.
Next, you need to enable debugging, otherwise, you will not be able to connect to the microcontroller for debugging. To do this, set Pinout & Configuration -> System Core -> SYS -> Debug to Serial Wire.
If you accidentally flashed the microcontroller without enabling debugging and the programmer can no longer detect it, it's not critical. You can fix this using the CubeProgrammer by erasing the firmware with the Reset mode set to Hardware reset. To make this work, you need to connect the RST pin to the programmer (in addition to SWDIO and SWCLK).
At this point, the mandatory part is over, and now you need to choose what to activate based on your project requirements. I will add a button, an LED, and UART.
-
For the LED, select pin
PA5, set it toGPIO_Output, and assign auser label-LED(right-click on the pin). -
For the button, select pin
PC13, switch it toGPIO_EXTImode, and also assign auser label-BTN. However, for the interrupt to work, it needs to be activated:Pinout & Configuration -> System Core -> NVICand then setEXTI line [15:10] interrupts(mine is line 13). -
For
UART, you need to activatePinout & Configuration -> Connectivity -> LPUART1 -> Modeand set it toAsynchronous. Also, in theConfigurationwindow, set the speed to115200 Bits/s. We'll leave the rest as default. I also needed to change the default pins fromPC0andPC1toPA3andPA2respectively (this is done by holdingAlt + Clickon the desired pin to move it).
Here are a few interesting points that might not be immediately obvious:
- Alternate pins for a peripheral block are selected via
Alt + Left Click, as described in the example above. - With
Ctrl + K, you can set or unset the flagPinout -> Keep Current Signal Placement. If this flag is set, no already assigned pins will be automatically changed. If it is not set, pins marked with theSignal Pinningbutton will not be changed, but others may automatically change when selecting peripherals that use them. I recommend always setting this flag to prevent pins from changing their positions unexpectedly. - It is better to assign user names (
LEDandBTNin the example above) to pins used asGPIO. This allows for easy identification when writing code using auto-completion. For other peripherals, this does not make sense, as they are accessed using the IP block number. - Using
Alt + LorPinout -> List pinout comparable MCU's, you can find pin-to-pin compatible controllers for the current pin configuration. Alt + DorHelp -> Docs & Resourceswill open a menu with all the documents for this controller, such asErrata,Reference Manual,Application Note, etc.Ctrl + Left Clickallows you to move a pin function to an available position.
Now, a few words about Clock Configuration. Don't be afraid of the abundance of windows with adjustable values; in reality, we need only a few things from here.
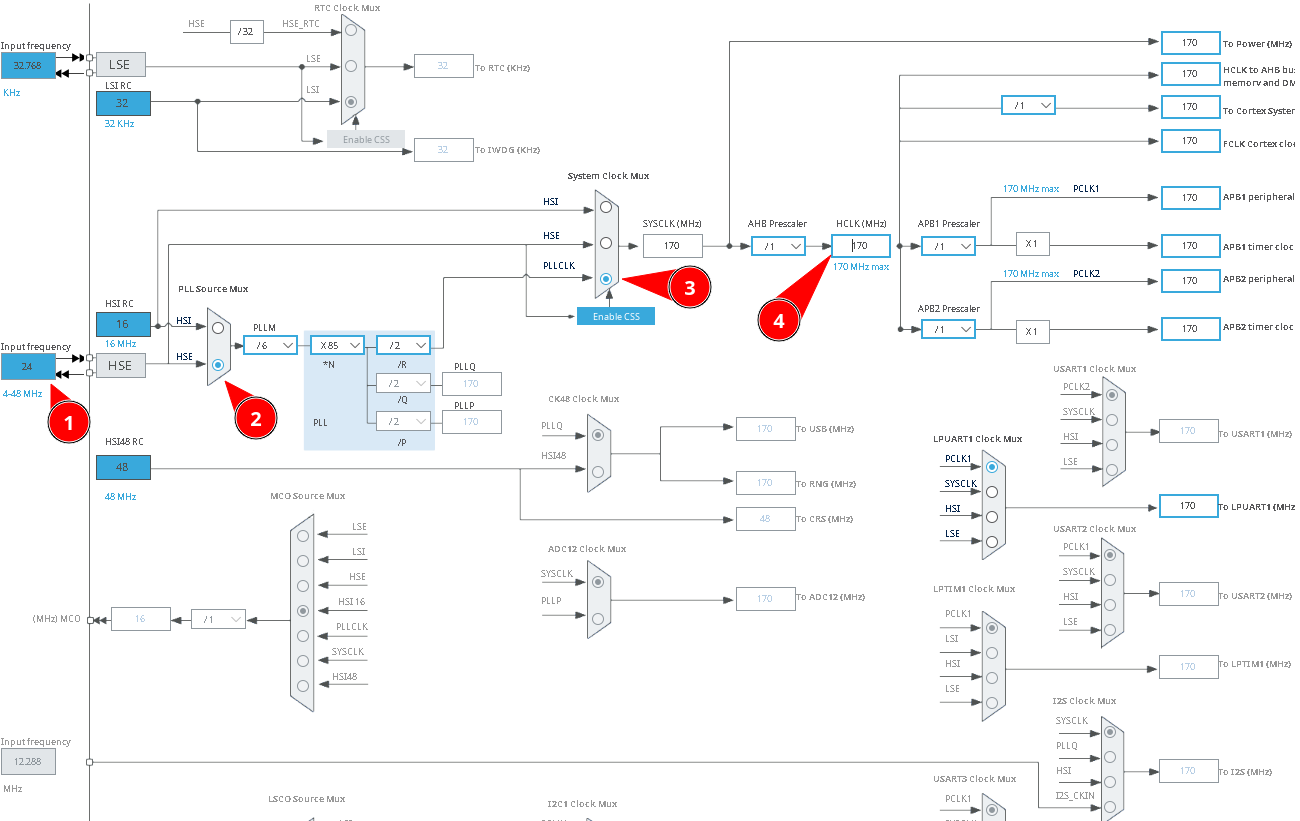
The most important thing is to check that the quartz crystal frequencies match the actual crystal on the board (1). In my case, they didn't match, so I changed it from 8 MHz to 24 MHz. Next, you can enable PLL clocking from the crystal (2) and set the PLL signal as the clock source for the CPU and buses (3). After this, you can set the maximum possible core frequency (4) to achieve maximum performance.
This is sufficient in 90% of cases. Complications may arise if a peripheral block requires a specific frequency, such as CAN. In this case, you can either clock the peripheral from another part of the PLL (on the screenshot above, this is PLLQ or PLLP) or use an internal generator. CubeMX will try to find the intermediate values automatically, and if it fails, you can manually adjust them.
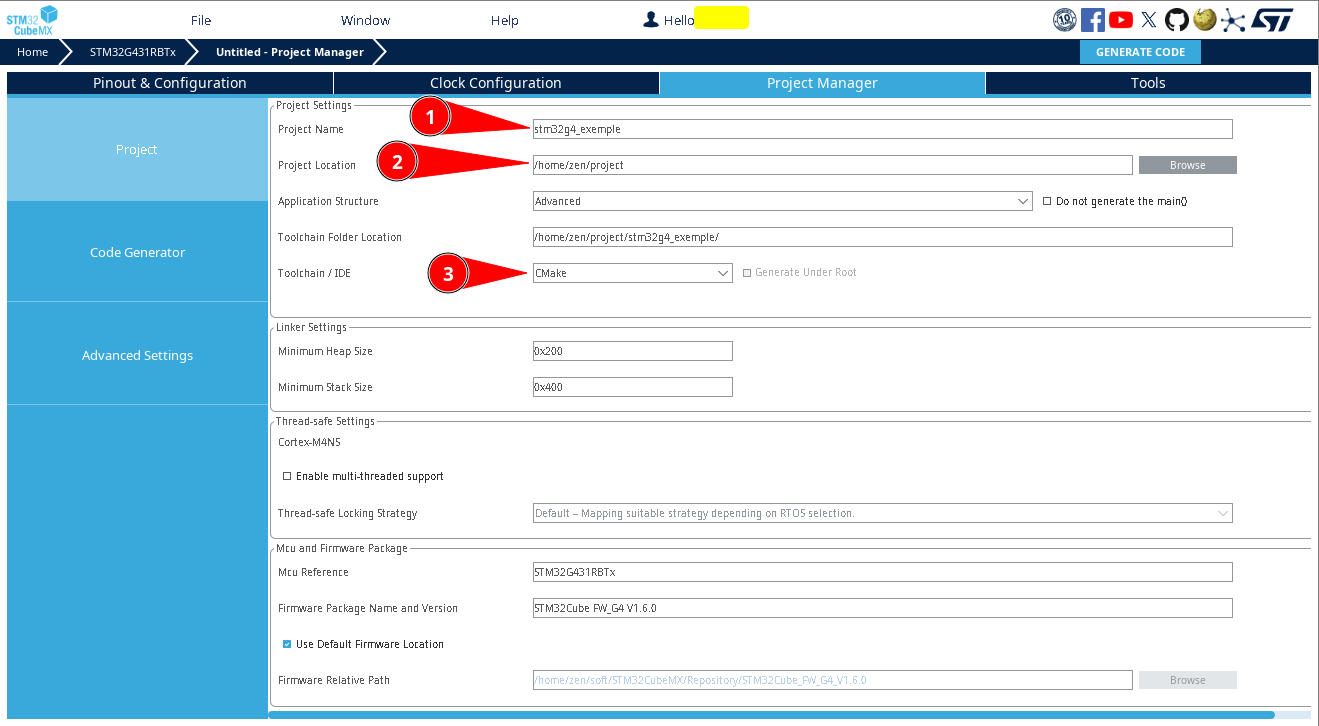
Next, we need to configure the project in the Project Manager tab. The following steps are necessary:
- Enter the project name in the
Project namefield (1). - Specify the project location in the
Project Locationfield (2). - In the
Toolchain/IDEsection, selectCMake(3). If you choose another tool, theVSCodeextension will not work with the project.
If you select Basic instead of Advanced in the Application Structure section, the generated source files will be placed in the root folder instead of the Core folder. I do not recommend doing this. You can also change the minimum stack and heap size, which can be useful when using RTOS, but we won't change anything for now.
Additionally, several parameters should be changed in Project Manager -> Code Generator:
- In the
STM32Cube MCU packages and embedded software packssection, it is better to select the optionCopy only the necessary library filesto avoid storing unused libraries in the project. - In the
Generated filessection, checkGenerate peripheral initialization as a pair of .c/.h files per peripheralso that CubeMX generates separate files for the description of various peripheral blocks instead of putting everything inmain.c. - Enable
Enable Full AssertinHAL Settings. This feature activates theassert_failedcallback when an error occurs in the peripheral operation. The template for this callback is located inmain.c. The callback returns the file name and the line of code where the error occurred. For this function to work, the names of all project files with their paths need to be stored in flash memory, so it is better to disable this function in the release version or if memory is scarce.
The last tab, Advanced Settings, allows you to choose the HAL or LL library for a specific peripheral block and configure the initialization sequence of the modules, which can be useful if there are initialization problems. In the Register Callback menu, you can select the peripheral for which the new callback mechanism will be used (passing the callback function address through the handler). If you leave it as Disable, the old __weak function mechanism will be used.
VSCode
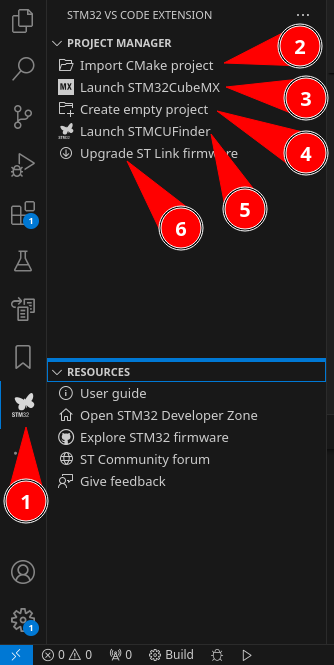
At this point, the work in CubeMX is complete, so let's consider working with the VSCode editor. After installing the plugin, a new tab with a butterfly icon (1) will become available in VSCode.
Immediately after installing the plugin, it will likely ask you to specify the path to the CubeCTL folder. You need to provide the path you chose during installation.
The extension allows you to perform a number of functions:
- Import a project with
CMake(2). This function will be used later. - Launch
CubeMX(3). This option simply launches CubeMX without opening the current project. - Create an empty project (4). This command opens a menu where you can select a microcontroller or debug board, and a bare project without
HAL,LL, or evenCMSISwill be generated. The project will contain only a linker script, aCMakebuild script, and a startup file in assembly. - Launch
MCU Finder(5), if it was installed. - Update the
stlinkfirmware.
For further work, you need to select project import (2), specify the path to the project generated by CubeMX, and then confirm the import.
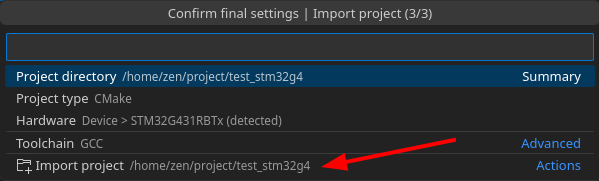
This function will generate a .vscode folder in the project root, containing a set of parameters for VSCode.
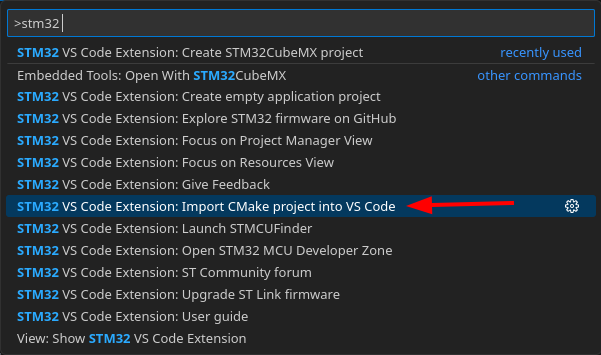
As can be seen from the description above, the project import function is the only useful one among those presented, so the menu itself is not particularly useful. To hide the icon in the right menu, right-click on it and select Hide STM32 VS Code Extension (you can bring it back by right-clicking in any area of the right menu). To access the project import function, you can use the console by pressing Ctrl + Shift + P and start typing stm32:
After this, the project will be ready to work. However, for the linter to work correctly, the project needs to be configured. This can be done through the CMake menu, but it is more convenient through the command menu: Ctrl + Shift + P -> CMake: Configure. You can build the project using the command Ctrl + Shift + P -> CMake: Build.
There is a chance that the
Import CMake project into VS Codecommand will not be available. In this case, you first need to launchSTM32 VS Code Extension: Focus on Project Manager View, after which the command will appear. It seems that this menu triggers some initialization upon the first launch, without which the import is not possible.
Project Organization in C
Let's look at the structure of a typical project. To do this, in addition to what CubeMX has created, we need to add three more folders:
- App - The main application logic.
- Bsp - Libraries for devices (chips) located on a specific board.
- Docs - Documentation required for the project.
In each of these folders (except Docs), create two subfolders: Src and Inc, to maintain consistency with the code generated by CubeMX. The Bsp folder will not be needed in our example, as we will be interacting with peripherals at the HAL level. This is sufficient for our example, but for serious solutions, it is better to wrap such things in BSP level functions.
Next, create two files: App/Src/app.c and App/Inc/app.h:
mkdir App App/Src App/Inc && touch App/Src/app.c App/Inc/app.happ.h should include stdint.h. This is necessary so that our function definitions can contain additional types such as int8_t, uint32_t, and similar types. Additionally, the file should include the definition void app(void), which will be used as main():
#ifndef __APP_H__
#define __APP_H__

#include <stdint.h>
void app();

#endif /* __APP_H__ */
In app.c, we will implement the working logic:
#include "app.h"
#include "usart.h"
#include "gpio.h"
#include <stdio.h>

uint32_t press_count = 0;

void app()
{
    while (1)
    {
        HAL_GPIO_TogglePin(LED_GPIO_Port, LED_Pin);
        static uint32_t i = 0;
        printf("N: %ld, Buttion count: %ld.\r\n", i++, press_count);
        HAL_Delay(500);
    }
}

int _write(int file, char *ptr, int len)
{
    (void)file; // hack for fix warning - unused int file.
    HAL_UART_Transmit(&hlpuart1, (uint8_t *)ptr, len, 1000);
    return len;
}

void HAL_GPIO_EXTI_Callback(uint16_t GPIO_Pin)
{
    if (GPIO_Pin == GPIO_PIN_13)
        press_count++;
}
This program toggles the LED state twice per second and prints a message to the console with its number and the number of button presses.
The function int _write() needs to be defined for printf() to work correctly. It is implemented as blocking, which may not be the most optimal implementation, but it will suffice for our example.
Next, you need to add a call to app() in main.c and add #include "app.h", as well as implement the assert_failed function:
/* USER CODE BEGIN Includes */
#include "app.h"
/* USER CODE END Includes */
// ....
/* USER CODE BEGIN WHILE */
app();
while (1) {
/* USER CODE END WHILE */
// ....
/* USER CODE BEGIN 6 */
printf("Wrong parameters value: file %s on line %ld\r\n", file, line);
/* USER CODE END 6 */
To ensure that our code is not removed when peripheral parameters are changed, it must be placed between USER CODE BEGIN and USER CODE END blocks. Therefore, the example above includes the lines that need to be inserted in the correct places in the generated main.c. By creating a separate folder for the project's source code, we avoid the need to track CODE BEGIN -> CODE END blocks, which greatly simplifies life.
The last block of code with Wrong parameters value is the implementation of void assert_failed(uint8_t *file, uint32_t line). This function will be called in case of an error inside HAL and will output the line number and the path to the source file in the project. Since all paths are stored in flash memory, it is better to disable this function in the release.
Next, to ensure our new code is built and the linter understands it correctly, the information about the new files needs to be added to the lists of header and source directories within CMake, as follows:
# Add sources to executable
target_sources(${CMAKE_PROJECT_NAME} PRIVATE
    "App/Src/app.c"
)

# Add include paths
target_include_directories(${CMAKE_PROJECT_NAME} PRIVATE
    "App/Inc"
)
While writing this code, you might have noticed (there is a chance this has been fixed by the time you read this article) that the PROBLEMS tab shows one issue - a warning in CMakeLists.txt related to enable_language() being called before project(). This can be easily resolved by swapping these lines:
# Core project settings
project(${CMAKE_PROJECT_NAME})
message("Build type: " ${CMAKE_BUILD_TYPE})

# Enable CMake support for ASM and C languages
enable_language(C ASM)
This file is generated only once, and changes will not be overwritten when the project is regenerated.
Next, let's consider some useful but not immediately obvious things:
Ctrl + Shift + Iwill trigger auto-formatting. In theVS Codesettings, you can choose the formatting style, but I usually use the standard one.Ctrl + P- search for a file by name in the project.Alt + Backspace- can be set as the hotkey for returning to the previous cursor position. To do this, set the hotkey forGo Back(open the keybindings menu withCtrl + K->Ctrl + S).- To enable the display of all characters (spaces, tabs, etc.), set
editor.renderWhitespacetoall. - To disable middle-click paste, uncheck
editor.selectionClipboard. - To display a vertical ruler at 80 characters, set
"editor.rulers": [80]. You can also set multiple values separated by commas to display several vertical lines, for example:"editor.rulers": [100, 80].
If you need spell checking, you can install the streetsidesoftware.code-spell-checker extension. However, after installation, you might find that all spell checker warnings are displayed in the PROBLEMS panel, making it difficult to see linter warnings. To solve this problem, switch to the beta version of the extension, which will display warnings in a separate window.
Project Organization in C++
To add support for C++, you need to create the same files (delete the previous ones), but with .cpp instead of .c and .hpp instead of .h.
mkdir App App/Src App/Inc && touch App/Src/app.cpp App/Inc/app.hppIn app.hpp, add the definition for the app() function, as well as a wrapper for calling this function from C code app_c():
#ifndef __APP_H__
#define __APP_H__

#include <stdint.h>

#ifdef __cplusplus
extern "C"
{
#endif
    void app_c(void);
#ifdef __cplusplus
}
#endif

void app(void);

#endif /* __APP_H__ */
In the app.cpp file, define the app() function, which will become our new main(), and also add a TEST class as an example. Naturally, in normal code, this class should be moved to a separate file, but for illustration purposes, this will do.
app.cpp:
#include "app.hpp"
#include "usart.h"
#include "gpio.h"
#include <stdio.h>

uint32_t press_count = 0;

extern "C" void app_c(void)
{
    app();
}

class TEST
{
public:
    void toggle_print();
};

void app(void)
{
    TEST blink;
    while (1)
    {
        blink.toggle_print();
        HAL_Delay(100);
    }
}

void TEST::toggle_print()
{
    HAL_GPIO_TogglePin(LED_GPIO_Port, LED_Pin);
    static uint32_t i = 0;
    printf("N: %ld, Buttion count: %ld.\r\n", i++, press_count);
}

extern "C" int _write(int file, char *ptr, int len)
{
    (void)file; // hack for fix warning - unused int file.
    HAL_UART_Transmit(&hlpuart1, (uint8_t *)ptr, len, 1000);
    return len;
}

extern "C" void HAL_GPIO_EXTI_Callback(uint16_t GPIO_Pin)
{
    if (GPIO_Pin == GPIO_PIN_13)
        press_count++;
}
Also, in main.c, replace the call to the app() function with app_c(), and include app.hpp instead of app.h. It is important to note that app.hpp is added to main.c, so it cannot contain any classes or other C++ specific constructs. It is better not to add anything else to this file, and implement additional program logic in other files.
To override C functions within C++, you must use extern "C", otherwise the linker will not be able to find the desired function. This is related to the implementation of static polymorphism in C++ - the language saves the type of parameters within the function label name (name mangling). You can read more about this here.
Also, you need to change CMakeLists.txt:
# Enable CMake support for ASM and C languages
enable_language(CXX C ASM)

# .......

# Add sources to executable
target_sources(${CMAKE_PROJECT_NAME} PRIVATE
    "App/Src/app.cpp"
)

# Add include paths
target_include_directories(${CMAKE_PROJECT_NAME} PRIVATE
    "App/Inc"
)
CXX adds the C++ compiler.
Debugging the Project
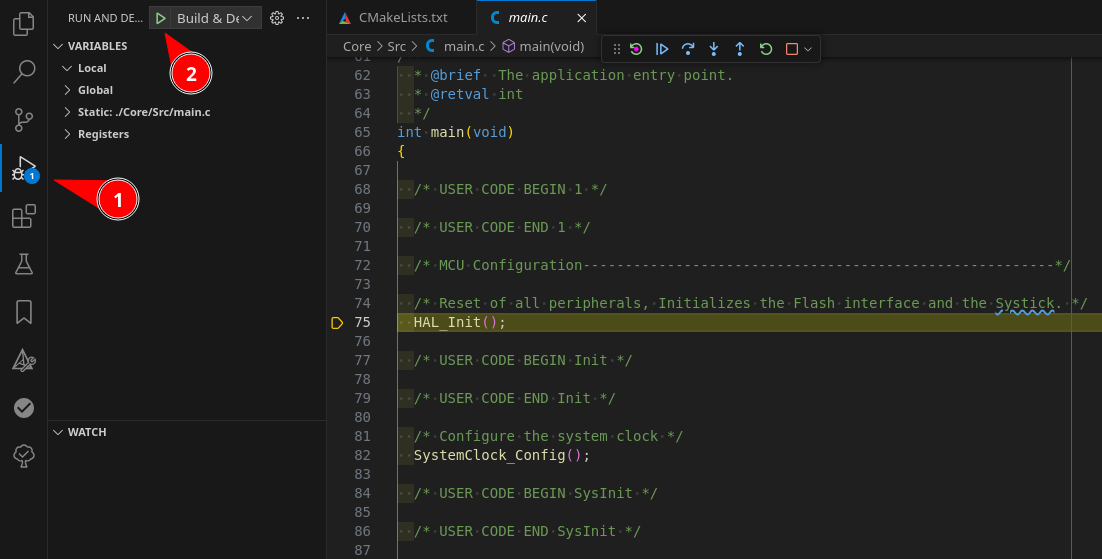
To flash and debug, you can use the side debug menu (1) -> (2) or the F5 button:
Here you might encounter an issue where the debugger simply does not start and no error messages are displayed. I faced this problem on Ubuntu 24.04 LTS and spent a lot of time resolving it. It turned out that the error could be found by running the arm-none-eabi-gdb debugger directly from the console:
zen@pc:~$ arm-none-eabi-gdb
arm-none-eabi-gdb: error while loading shared libraries: libncurses.so.5: cannot open shared object file: No such file or directory
If you search for a solution on the ST forum, they will kindly inform you that Ubuntu 24.04 LTS is simply not supported. Instead, we will just download and install the missing components manually:
wget http://archive.ubuntu.com/ubuntu/pool/universe/n/ncurses/libtinfo5_6.4-2_amd64.deb && sudo dpkg -i libtinfo5_6.4-2_amd64.deb && rm -f libtinfo5_6.4-2_amd64.deb
wget http://archive.ubuntu.com/ubuntu/pool/universe/n/ncurses/libncurses5_6.4-2_amd64.deb && sudo dpkg -i libncurses5_6.4-2_amd64.deb && rm -f libncurses5_6.4-2_amd64.deb
Next, let's take a closer look at the debugging process:
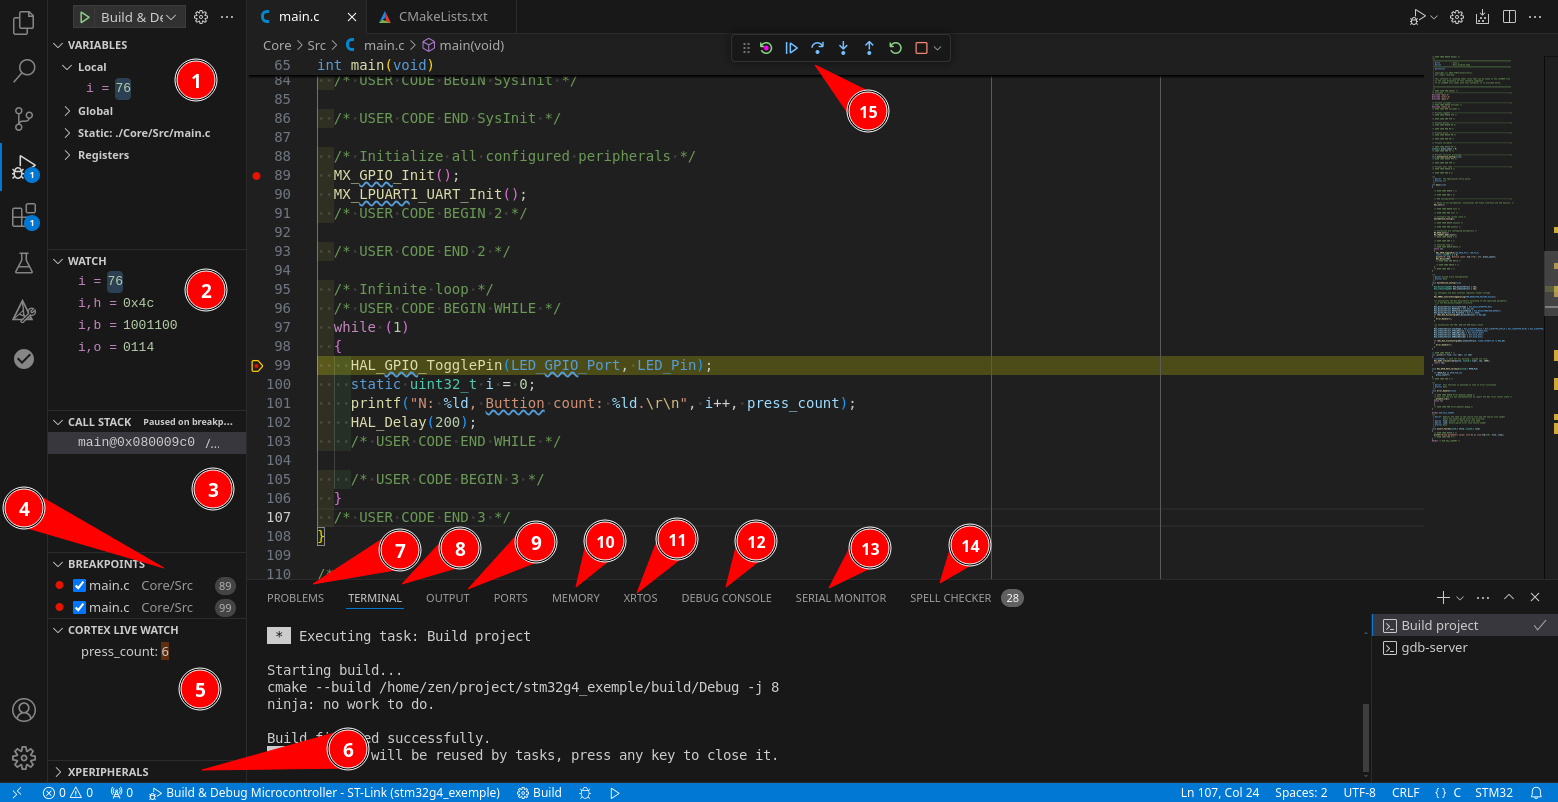
- Local, static, global variables and processor registers. This field is available in any IDE.
- Watch specific variables. In this field, you can select specific variables to watch and specify the output format. For example,
var,hwill display the variable in hex format. Available formats areb(binary),o(octal),cands(string). You can also use C type casts, for example,*varwill display what is at the address invar,*(char *)(0x2002ff64)will display the 8-bit value at the raw address0x2002ff64,*(uint32_t[10] *)(0x2002ff64)will display an array of 10 elements at the raw address0x2002ff64. - Call stack. An interesting feature is that you can open the disassembly of a specific function via
Right click -> Open Disassembly View. - List of breakpoints.
- Field for real-time monitoring of global variables. However, to enable this feature, you need to add the following to the
.vscode/launch.jsonfile underconfigurations:
"liveWatch": {
    "enabled": true,
    "samplesPerSecond": 4   // частота опроса в секунду
}- View peripheral register values with addresses taken from SVD files in
CubeCTL.
The following windows are always available, not just in debug mode, but most of them are needed during debugging, so I will describe them here.
- Problems - This window will display all errors and warnings from the compiler or linter. Ideally, it should be empty.
- Terminal - This window shows the output of console utilities used for building and debugging, such as
CMakeandGDB server. You can also create your own terminal here if needed. - Output - Shows plugin outputs. Like the previous window, it's not particularly useful.
- Memory - This tab allows you to read large chunks of memory starting from a specific address and save it for further analysis. For example, in the above project, you can specify the address as
&press_countand see the memory chunk located at that address.

- Xrtos - Allows you to monitor tasks when using
RTOS. However, for this to work,RTOSmust be built with certain parameters to include the necessary additional information. - Debug console - This is the
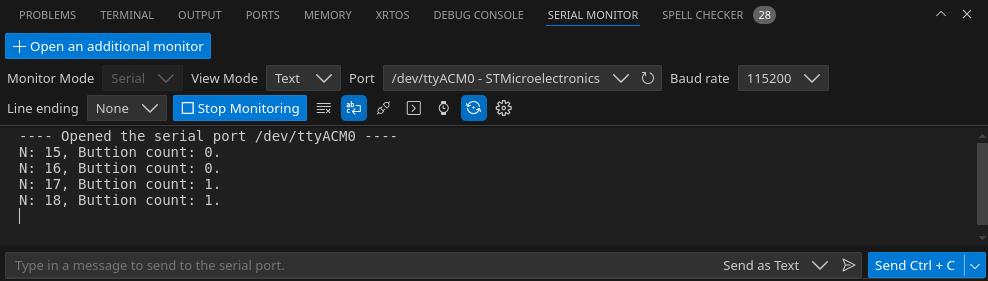
GDBdebugger console. You can directly enter commands and see the results. For example, the commandset output-radix 16will display everything inHEXformat, whileset output-radix 10will return everything to the default format. The same effect can be achieved by clicking0xin the header of window (1), (2), or (5). - Serial monitor - This is a serial console built into
VSCode. However, you need to install a separate plugin for it - ms-vscode.vscode-serial-monitor.
- Spell Checker - This window appears if you install the
streetsidesoftware.code-spell-checkerplugin, as described above. - Menu with standard actions such as stopping execution, continuing, stepping forward, etc.
This setup is sufficient for comfortable work, but I would like to highlight a few more points:
- You might not always need the program to stop at
main()when debugging starts. To disable this breakpoint, you need to comment out the parameter in the.vscode/launch.jsonfile:
// "runToEntryPoint": "main",- To build not only
elfbut alsobinandhex, you need to add the following to the end ofCMakeLists.txt:
# Add custom commands to generate .bin and .hex files
add_custom_command(TARGET ${CMAKE_PROJECT_NAME} POST_BUILD
    COMMAND ${CMAKE_OBJCOPY} -O binary $<TARGET_FILE:${CMAKE_PROJECT_NAME}> ${CMAKE_PROJECT_NAME}.bin
    COMMAND ${CMAKE_OBJCOPY} -O ihex $<TARGET_FILE:${CMAKE_PROJECT_NAME}> ${CMAKE_PROJECT_NAME}.hex
    COMMENT "Building ${CMAKE_PROJECT_NAME}.bin and ${CMAKE_PROJECT_NAME}.hex"
)- Sometimes it is useful to add new compilation flags. For example, you can add
-fsingle-precision-constant, which makes the compiler treat all floating-point constants asfloat. This is extremely useful because theSTM32G4FPU only works withFLOAT, and now you won't need to writefafter each constant. To do this, add a couple of lines in the middle (after the description of Debug and Release) ofcmake/gcc-arm-none-eabi.cmake:
# Add new C & C++ flag
set(CMAKE_C_FLAGS "${CMAKE_C_FLAGS} -fsingle-precision-constant")
GIT
To work with any Git service, you first need to create an empty project on the service with the same name as your current project. For me, this will be stm32_vscode_guide_exemple (1). It's better to use lowercase letters in the name since it will become the URL address.
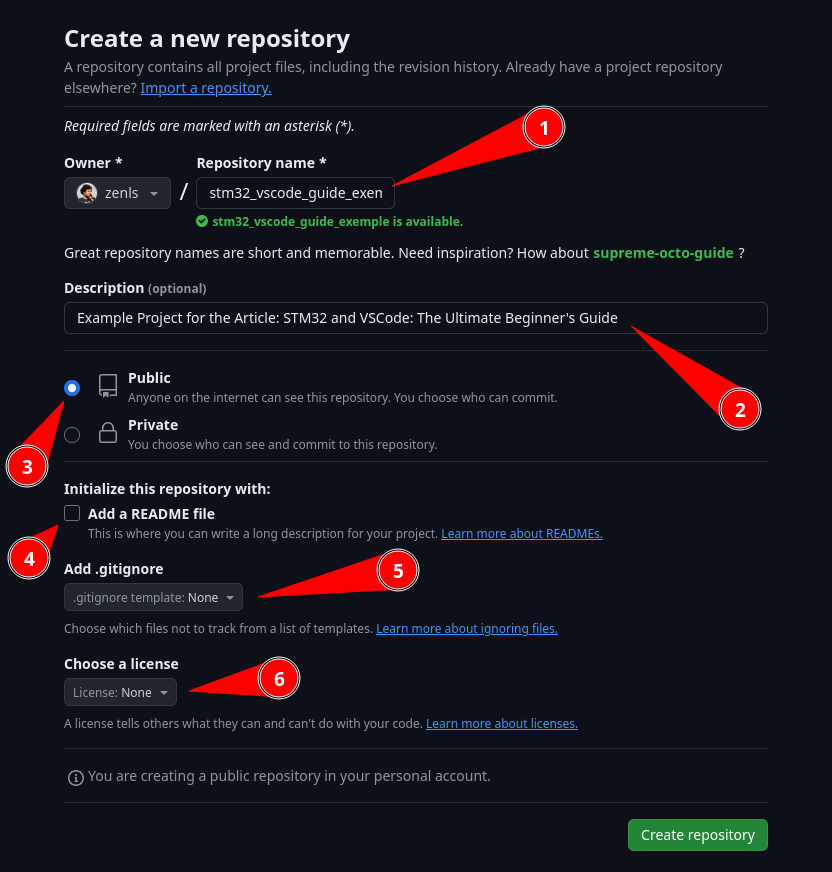
Next, you can fill in the Description (a brief project description) (2) and choose the project type (3), either private or public. I choose public so that you can view this project on my GitHub.
The following options (4), (5), and (6) should not be selected, because if you do, files will be created in the repository, and we won't be able to commit the existing project.
Then, create the repository using the Create repository button.
The next steps will take place locally with the project. First, you need to create two files: README.md and .gitignore.
touch README.md .gitignoreThe first file will contain the text displayed on the main page, and the second file is a list of files that will be ignored by the Git system. You can write anything you like in the first file. In the second file, list the files and folders that are temporary and don't need to be included in the project, primarily the build folder.
build/
CMakeFiles/
CMakeCache.txt
cmake_install.cmake
build.ninja
.mxproject
After this, you need to initialize the project and push it to the server.
git init
git add -A
git commit -m "first commit"
git remote add origin https://{your_git_address}/stm32_vscode_guide_exemple.git
git push -u origin master
Replace {your_git_address} with your Git server address.
There is a possibility that your default branch will be main instead of master. You can check this using the git status command. In that case, use main instead of master in the last command.
Also, if you are using Git for the first time, it will prompt you to enter your name and email.
You can learn more about Git on githowto. Common problems are described in Oh Shit, Git!?!.
Links
- VSCode.
- STM32 VS Code Extension.
- CubeMX docs.
- Project example.
- Git How To